Work in progress.
Indice
1. Preparación de los medios
2. Instalación Base
3. PXE Boot
4. FTP Server
5. Mail Sender
6. Motion
7. LAMP
8. Wordpress
9. Honeypot
10. Appendix
1. Preparacion de los medios
Borrar SD usando gparted, eliminar todas las particiones y crear nueva tabla de partición..
- Para instalar la imagen en la tarjeta SD /dev/sdX (cambiar por la dirección de su tarjeta SD # ls /dev/):
-To install the preview image on the SD card /dev/sdX, use (change /dev/sdX to your SD card device name # ls /dev/):
Compruebe aqui los enlazes actualizados https://raspi.debian.net/tested-images/
Check here for updated links https://raspi.debian.net/tested-images/
RPI3:~$ wget https://raspi.debian.net/verified/20200831_raspi_3.img.xz
RPI4:~$ wget https://raspi.debian.net/verified/20201112_raspi_4.img.xz
- Es recomendable comprobar la imagen comparándola a su correspondiente SHA256:
- It is recommended to check the image was correctly downloaded by comparing its SHA256:
RPI3:~$ wget https://raspi.debian.net/verified/20200831_raspi_3.xz.sha256
RPI3:~$ sha256sum -c 20200831_raspi_3.xz.sha256
RPI4:~$ wget https://raspi.debian.net/verified/20201112_raspi_4.xz.sha256
RPI4:~$ sha256sum -c 20201112_raspi_4.xz.sha256
Grabar SD, Burn SD
Modificar sdX con el nombre de su dispositivo
Modify sdX with the name of your device
RPI3:~$ sudo xzcat 20200831_raspi_3.img.xz | dd of=/dev/sdX bs=64k oflag=dsync status=progress
RPI4:~$ sudo xzcat 20201112_raspi_4.img.xz | dd of=/dev/sdX bs=64k oflag=dsync status=progress
RPI:~$ sync
Editar el archivo /etc/network/interfaces.d/wlan0 para tener conexión wifi al iniciar la SD (abrir terminal desde carpeta, su nano wlan0 , uncomment and set up)
Establecer hostname
Set hostname
~# nano /etc/hostname
ordenador
Establecer nombre de ordenador en red y IP
Set computer network name and IP
~# nano /etc/hosts
- comentar ipv6
- coment ipv6
- añadir para uso en red local
- add for local network use
127.0.0.1 ordenador
- para uso publico en internet deberia quedar mas o menos asi
- for public use in internet it should be more or less so
127.0.0.1 localhost.localdomain localhost
127.0.0.1 ordenador ordenador localhost
# con la ip de internet
# with the ip address
11.11.11.11 www.ordenador.com ordenador
# si quiere dirigir otro dominio
# if you want to redirect an other domain
127.0.0.1 otrodominio otrodominio localhost
11.11.11.11 www.otrodominio.com localhost
Permitir acceso via ssh a root
Permit root access via ssh
~# nano /etc/ssh/sshd_config
#PermitRootLogin prohibit-password
PermitRootLogin yes
Habilitar el autocompletado del bash
nano /etc/bash.bashrc
#uncoment to enable bash completion in interactive shells
if ! shopt -oq posix; then
if [ -f /usr/share/bash-completion/bash_completion ]; then
. /usr/share/bash-completion/bash_completion elif [ -f /etc/bash_completion ]; then
. /etc/bash_completion
fi
fi
AMD64: https://www.debian.org/releases/stable/amd64/index.es.html Solo seleccionar servidor ssh si se va a usar, Only select ssh server if it will be used.
2. Instalación base
Arrancar la Raspberry con la SD
Boot the Raspberry with fresh SD
Desde el ordenador del que acceder en ssh.
From the computer to access via ssh.
~# ifconfig
~# nmap 10.10.10.*
Para ayuda
For help
~# nmap --help
-Para acceder por ssh
-To access via ssh
~# ssh root@10.10.10.11
-Establecer contraseña de superusuario root
-Set superuser root password
RPI:~# passwd root
-Ajustar la Zona Horaria
-Setup Time Zone
RPI:~# dpkg-reconfigure tzdata
-Actualizar APT
-Upgrade APT
RPI:~# apt-get update
RPI:~# apt-get install console-data keyboard-configuration locales
RPI:~# dpkg-reconfigure locales
RPI:~# dpkg-reconfigure console-data
RPI:~# dpkg-reconfigure keyboard-configuration
RPI:~# nano /etc/apt/sources.list
deb http://deb.debian.org/debian bullseye main contrib non-free
#deb http://deb.debian.org/debian-security buster/updates main contrib non-free
RPI4:~# nano /etc/apt/apt.conf
RPI:~# apt-get update
RPI:~# apt-get dist-upgrade
~# reboot
-Herramientas basicas recomendadas.
-Basic recomended aplications.
~# apt-get install ftp wget wput links2 net-tools gpm testdisk lm-sensors sudo
-Cambiar adminuser
~# adduser adminuser
~# nano /etc/sudoers- añadir linia
# User privilege specification
root ALL=(ALL:ALL) ALL
adminuser ALL=(ALL) PASSWD:ALL
-Toda la instalacion de un comando
-Whole bulk instalation command
~# apt-get install wget wput ftp links2 net-tools lm-sensors gpm testdisk sudo isc-dhcp-server tftpd-hpa dnsutils curl default-mysql-server default-mysql-client sudo phpmyadmin motion vsftpd msmtp mailutils nmap
3. PXEBoot
PXE Boot permite arrancar ordenadores por red para instalaciones, recuperaciones y otros
PXE Boot Allows to boot computers for installations recoveries and others
~# apt-get install isc-dhcp-server tftpd-hpa dnsutils wget links2 net-tools lm-sensors nmap
~# nano /etc/dhcp/dhcpd.conf
####------------------------
ddns-update-style none; option domain-name "ordenador"; option domain-name-servers 10.10.10.10;
default-lease-time 6000;
max-lease-time 72000;
authoritative;
log-facility local7;
allow booting;
allow bootp;
# The next paragraph needs to be modified to fit your case
subnet 10.10.10.0 netmask 255.255.255.0 {
range 10.10.10.11 10.10.10.50;
option broadcast-address 10.10.10.255;
# the gateway address which can be different
# (access to the internet for instance)
option routers 10.10.10.10;
# indicate the dns you want to use
option domain-name-servers 10.10.10.10;
}
group {
next-server 10.10.10.11;
host tftpclient {
# tftp client hardware address
hardware ethernet 00:00:00:00:00:00;
# pana netboot universal
filename "netboot.xyz.kpxe";
# pana netboot UEFI
# filename "netboot.xyz.efi";
# para debian
# filename "netboot/pxelinux.0";
}
}
#####̣---------------------
-Subir imagen netboot universal
-Upload universal netboot
~# wget https://boot.netboot.xyz/ipxe/netboot.xyz.kpxe
~# mv netboot.xyz.kpxe /srv/tftp/netboot.xyz.kpxe
-UEFI universal netboot
~# wget https://boot.netboot.xyz/ipxe/netboot.xyz.efi
~# mv netboot.xyz.efi /srv/tftp/netboot.xyz.efi
-El debian netboot tambien va bien
~# wget http://ftp.nl.debian.org/debian/dists/buster/main/installer-amd64/current/images/netboot/gtk/netboot.tar.gz
~# mkdir /srv/tftp/netboot
~# tar -xzvf netboot.tar.gz -C /srv/tftp/netboot/
# nano /etc/default/isc-dhcp-server
###########------------------------
# Defaults for isc-dhcp-server (sourced by /etc/init.d/isc-dhcp-server)
# Path to dhcpd's config file (default: /etc/dhcp/dhcpd.conf).
DHCPDv4_CONF=/etc/dhcp/dhcpd.conf
#DHCPDv6_CONF=/etc/dhcp/dhcpd6.conf # Path to dhcpd's PID file (default: /var/run/dhcpd.pid).
DHCPDv4_PID=/var/run/dhcpd.pid#DHCPDv6_PID=/var/run/dhcpd6.pid
# Additional options to start dhcpd with.
# Don't use options -cf or -pf here; use DHCPD_CONF/ DHCPD_PID instead#OPTIONS=""
# On what interfaces should the DHCP server (dhcpd) serve DHCP requests?
# Separate multiple interfaces with spaces, e.g. "eth0 eth1".
INTERFACESv4="eth0 wlan0"
#other no RPI machines check interfaces names with ~# ifconfig
#INTERFACESv6=""
############̣̣̣̣----------------------------
~# /etc/init.d/isc-dhcp-server start
~# /etc/init.d/tftpd-hpa start
4. FTP Server
El servidor FTP es util para transferir y gestionar archivos y/o automatizaciar la transferencia de archivos.
FTP server is usefull to transfer and manage files and/or automatize file transfers.
~# apt-get install vsftpd ftp wget wput links2 net-tools lm-sensors nmap
-Crear usuario restringido para el acceso ftp, cambiar ftpuser
-Create a restricted user for ftp access, change ftpuser
~# adduser ftpuser
~# nano /etc/passwd
- Cambiar la linia
ftpuser:x:1001:1001:,,,:/home/ftuser:/bin/bash
A. To
ftpuser:x:1001:1001::/home/ftuser:/bin/bash
~# nano /etc/vsftpd.conf
##########
# Example config file /etc/vsftpd.conf
#
# The default compiled in settings are fairly paranoid. This sample file
# loosens things up a bit, to make the ftp daemon more usable.
# Please see vsftpd.conf.5 for all compiled in defaults.
#
# READ THIS: This example file is NOT an exhaustive list of vsftpd options.
# Please read the vsftpd.conf.5 manual page to get a full idea of vsftpd's
# capabilities.
#
#
# Run standalone? vsftpd can run either from an inetd or as a standalone
# daemon started from an initscript.
listen=NO
#
# This directive enables listening on IPv6 sockets. By default, listening
# on the IPv6 "any" address (::) will accept connections from both IPv6
# and IPv4 clients. It is not necessary to listen on *both* IPv4 and IPv6
# sockets. If you want that (perhaps because you want to listen on specific
# addresses) then you must run two copies of vsftpd with two configuration
# files.
listen_ipv6=NO
#
# Allow anonymous FTP? (Disabled by default).
anonymous_enable=NO
#
# Uncomment this to allow local users to log in.
local_enable=YES
#
# Uncomment this to enable any form of FTP write command.
#write_enable=YES
#
# Default umask for local users is 077. You may wish to change this to 022,
# if your users expect that (022 is used by most other ftpd's)
#local_umask=022
#
# Uncomment this to allow the anonymous FTP user to upload files. This only
# has an effect if the above global write enable is activated. Also, you will
# obviously need to create a directory writable by the FTP user.
#anon_upload_enable=YES
#
# Uncomment this if you want the anonymous FTP user to be able to create
# new directories.
#anon_mkdir_write_enable=YES
#
# Activate directory messages - messages given to remote users when they
# go into a certain directory.
dirmessage_enable=YES
#
# If enabled, vsftpd will display directory listings with the time
# in your local time zone. The default is to display GMT. The
# times returned by the MDTM FTP command are also affected by this
# option.
use_localtime=YES
#
# Activate logging of uploads/downloads.
xferlog_enable=YES
#
# Make sure PORT transfer connections originate from port 20 (ftp-data).
connect_from_port_20=YES
#
# If you want, you can arrange for uploaded anonymous files to be owned by
# a different user. Note! Using "root" for uploaded files is not
# recommended!
#chown_uploads=YES
#chown_username=whoever
#
# You may override where the log file goes if you like. The default is shown
# below.
#xferlog_file=/var/log/vsftpd.log
#
# If you want, you can have your log file in standard ftpd xferlog format.
# Note that the default log file location is /var/log/xferlog in this case.
#xferlog_std_format=YES
#
# You may change the default value for timing out an idle session.
#idle_session_timeout=600
#
# You may change the default value for timing out a data connection.
#data_connection_timeout=120
#
# It is recommended that you define on your system a unique user which the
# ftp server can use as a totally isolated and unprivileged user.
#nopriv_user=ftpsecure
#
# Enable this and the server will recognise asynchronous ABOR requests. Not
# recommended for security (the code is non-trivial). Not enabling it,
# however, may confuse older FTP clients.
#async_abor_enable=YES
#
# By default the server will pretend to allow ASCII mode but in fact ignore
# the request. Turn on the below options to have the server actually do ASCII
# mangling on files when in ASCII mode.
# Beware that on some FTP servers, ASCII support allows a denial of service
# attack (DoS) via the command "SIZE /big/file" in ASCII mode. vsftpd
# predicted this attack and has always been safe, reporting the size of the
# raw file.
# ASCII mangling is a horrible feature of the protocol.
#ascii_upload_enable=YES
#ascii_download_enable=YES
#
# You may fully customise the login banner string:
ftpd_banner= Hello World !! It Works !!
#
# You may specify a file of disallowed anonymous e-mail addresses. Apparently
# useful for combatting certain DoS attacks.
#deny_email_enable=YES
# (default follows)
#banned_email_file=/etc/vsftpd.banned_emails
#
# You may restrict local users to their home directories. See the FAQ for
# the possible risks in this before using chroot_local_user or
# chroot_list_enable below.
#chroot_local_user=YES
#
# You may specify an explicit list of local users to chroot() to their home
# directory. If chroot_local_user is YES, then this list becomes a list of
# users to NOT chroot().
# (Warning! chroot'ing can be very dangerous. If using chroot, make sure that
# the user does not have write access to the top level directory within the
# chroot)
#chroot_local_user=YES
#chroot_list_enable=YES
# (default follows)
#chroot_list_file=/etc/vsftpd.chroot_list
#
# You may activate the "-R" option to the builtin ls. This is disabled by
# default to avoid remote users being able to cause excessive I/O on large
# sites. However, some broken FTP clients such as "ncftp" and "mirror" assume
# the presence of the "-R" option, so there is a strong case for enabling it.
#ls_recurse_enable=YES
#
# Customization
#
# Some of vsftpd's settings don't fit the filesystem layout by
# default.
#
# This option should be the name of a directory which is empty. Also, the
# directory should not be writable by the ftp user. This directory is used
# as a secure chroot() jail at times vsftpd does not require filesystem
# access.
secure_chroot_dir=/var/run/vsftpd/empty
#
# This string is the name of the PAM service vsftpd will use.
pam_service_name=vsftpd
#
# This option specifies the location of the RSA certificate to use for SSL
# encrypted connections.
rsa_cert_file=/etc/ssl/certs/ssl-cert-snakeoil.pem
rsa_private_key_file=/etc/ssl/private/ssl-cert-snakeoil.key
ssl_enable=NO
#
# Uncomment this to indicate that vsftpd use a utf8 filesystem.
utf8_filesystem=YES
userlist_file=/etc/vsftpd.userlist
userlist_enable=YES
userlist_deny=NO
#############
~# nano /etc/vsftpd.userlist
ftpuser
~# /etc/init.d/vsftpd start
5. Mail Sender
En este proyecto la necestidad del enviador de correo por una parte es para enviar los videos, fotos o avisos de la camara, y por otra los logs de los servicios eje central del honeypot.
In this project the need for a mail sender is in part to send video fotos alerts from the camera, and on the other part to send logs of services central axis of the honeypot.
~# apt-get install msmtp mailutils mutt
Para configuraciones por usuarios
~# cd ~
~# nano .msmtprc
Para configuracion global
~# nano /etc/msmtp
############
# Set default values for all following accounts.
defaults
auth on
tls on
tls_trust_file /etc/ssl/certs/ca-certificates.crt
logfile ~/.msmtp.log
# Gmail
account gmail
host smtp.gmail.com
port 587
from user@gmail.com
user user@gmail.com
password p4ssw0rd
# A freemail service
#account freemail
#host smtp.freemail.example
#from joe_smith@freemail.example#...
# Set a default account
account default : gmail
##########
~# nano /etc/mail.rc
set mta=/usr/bin/msmtp
~# nano /etc/msmtprc
aliases /etc/aliases
:~# nano /etc/aliases
# Example aliases file
# Send root to Joe and Jane
root: joe_smith@example.com, jane_chang@example.com
# Send everything else to admin
default: admin@domain.example
--Probar la funcionalidad. La opcion (--account=,-a) dice que cuenta usar como enviador, ejemplos:
--Test funccionality. The account option (--account=,-a) tells which account to use as sender, examples:
~$ echo "hello there username." | msmtp -a default username@domain.com
~$ printf "Subject: Test\nhello there username." | msmtp -a default username@domain.com
~$ nano test.mail
To: username@domain.com
From: username@gmail.com
Subject: A test
Hello there.
~$ cat test.mail | msmtp -a default <username>@domain.com
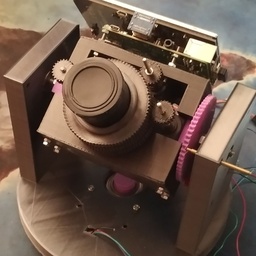
6. Motion
Motion es un programa de captura de video con sensor de movimiento altamente configurable para el envio de imagenes y videos y sistemas de traking.
Motion is a video capture program with motion sensor highly configurable for image and video upload and traking systems.
~# apt-get install motion wget wput ftp links2 testdisk lm-sensors gpm net-tools sudo
- Ver https://motion-project.github.io/motion_config.html .
- See https://motion-project.github.io/motion_config.html
~# nano /etc/motion/motion.conf
# Rename this distribution example file to motion.conf
#
# This config file was generated by motion 4.3.2
# Documentation: /usr/share/doc/motion/motion_guide.html
#
# This file contains only the basic configuration options to get a
# system working. There are many more options available. Please
# consult the documentation for the complete list of all options.
#
############################################################
# System control configuration parameters
############################################################
# Start in daemon (background) mode and release terminal.
daemon on
# Start in Setup-Mode, daemon disabled.
setup_mode off
# File to store the process ID.
; pid_file value
# File to write logs messages into. If not defined stderr and syslog is used.
log_file /var/log/motion/motion.log
# Level of log messages [1..9] (EMG, ALR, CRT, ERR, WRN, NTC, INF, DBG, ALL).
log_level 6
# Target directory for pictures, snapshots and movies
target_dir /home/ftpuser/motion
# Video device (e.g. /dev/video0) to be used for capturing.
videodevice /dev/video0
# Parameters to control video device. See motion_guide.html
; vid_control_params value
# The full URL of the network camera stream.
; netcam_url value
# Name of mmal camera (e.g. vc.ril.camera for pi camera).
; mmalcam_name value
# Camera control parameters (see raspivid/raspistill tool documentation)
; mmalcam_control_params value
############################################################
# Image Processing configuration parameters
############################################################
# Values :
# V4L2_PIX_FMT_SN9C10X : 0 'S910'
# V4L2_PIX_FMT_SBGGR16 : 1 'BYR2'
# V4L2_PIX_FMT_SBGGR8 : 2 'BA81'
# V4L2_PIX_FMT_SPCA561 : 3 'S561'
# V4L2_PIX_FMT_SGBRG8 : 4 'GBRG'
# V4L2_PIX_FMT_SGRBG8 : 5 'GRBG'
# V4L2_PIX_FMT_PAC207 : 6 'P207'
# V4L2_PIX_FMT_PJPG : 7 'PJPG'
# V4L2_PIX_FMT_MJPEG : 8 'MJPEG'
# V4L2_PIX_FMT_JPEG : 9 'JPEG'
# V4L2_PIX_FMT_RGB24 : 10 'RGB3'
# V4L2_PIX_FMT_SPCA501 : 11 'S501'
# V4L2_PIX_FMT_SPCA505 : 12 'S505'
# V4L2_PIX_FMT_SPCA508 : 13 'S508'
# V4L2_PIX_FMT_UYVY : 14 'UYVY'
# V4L2_PIX_FMT_YUYV : 15 'YUYV'
# V4L2_PIX_FMT_YUV422P : 16 '422P'
# V4L2_PIX_FMT_YUV420 : 17 'YU12'
#
v4l2_palette 17
# Image width in pixels.
width 640
# Image height in pixels.
height 360
# Maximum number of frames to be captured per second.
framerate 15
# Text to be overlayed in the lower left corner of images
text_left CAMERA1
# Text to be overlayed in the lower right corner of images.
text_right %Y-%m-%d\n%T-%q
############################################################
# Motion detection configuration parameters
############################################################
# Always save pictures and movies even if there was no motion.
emulate_motion off
# Threshold for number of changed pixels that triggers motion.
threshold 1500
# Noise threshold for the motion detection.
; noise_level 32
# Despeckle the image using (E/e)rode or (D/d)ilate or (l)abel.
despeckle_filter EedDl
# Number of images that must contain motion to trigger an event.
minimum_motion_frames 1
# Gap in seconds of no motion detected that triggers the end of an event.
event_gap 60
# The number of pre-captured (buffered) pictures from before motion.
pre_capture 3
# Number of frames to capture after motion is no longer detected.
post_capture 0
############################################################
# Script execution configuration parameters
############################################################
# Command to be executed when an event starts.
; on_event_start value
# Command to be executed when an event ends.
; on_event_end value
############################################################
# Picture output configuration parameters
############################################################
# Output pictures when motion is detected
picture_output off
# File name(without extension) for pictures relative to target directory
picture_filename %Y%m%d%H%M%S-%q
# Command to be executed when a picture (.ppm|.jpg) is saved (default: none)
# To give the filename as an argument to a command append it with %f
; on_picture_save mutt -a %f -s "raspi cam" -- <username>@domain.com < /home/ftpuser/test.txt
############################################################
# Movie output configuration parameters
############################################################
# Create movies of motion events.
movie_output on
# Maximum length of movie in seconds.
movie_max_time 60
# The encoding quality of the movie. (0=use bitrate. 1=worst quality, 100=best)
movie_quality 45
# Container/Codec to used for the movie. See motion_guide.html
movie_codec mkv
# File name(without extension) for movies relative to target directory
movie_filename %t-%v-%Y%m%d%H%M%S
# Command to be executed when a movie file is closed.
; on_movie_end mutt -a %f -s "raspi cam" -- <username>@domain.com < /home/ftpuser/test.mail
############################################################
# Webcontrol configuration parameters
############################################################
# Port number used for the webcontrol.
webcontrol_port 8080
# Restrict webcontrol connections to the localhost.
webcontrol_localhost off
# Type of configuration options to allow via the webcontrol.
webcontrol_parms 0
# Authentication for the http based control. Syntax username:password
# Default: not defined (Disabled)
webcontrol_authentication usercam:campassword
############################################################
# Live stream configuration parameters
############################################################
# The port number for the live stream.
stream_port 8081
# Quality of the jpeg (in percent) images produced (default: 50)
stream_quality 50
# Output frames at 1 fps when no motion is detected and increase to the
# rate given by stream_maxrate when motion is detected (default: off)
stream_motion off
# Restrict stream connections to the localhost.
stream_localhost off
# Maximum framerate for streams (default: 1)
stream_maxrate 12
# Limits the number of images per connection (default: 0 = unlimited)
# Number can be defined by multiplying actual stream rate by desired number of seconds
# Actual stream rate is the smallest of the numbers framerate and stream_maxrate
stream_limit 0
# Set the authentication method (default: 0)
# 0 = disabled
# 1 = Basic authentication
# 2 = MD5 digest (the safer authentication)
stream_auth_method 1
# Authentication for the stream. Syntax username:password
# Default: not defined (Disabled)
stream_authentication camuser:campassword
# Percentage to scale the preview stream image (default: 25)
stream_preview_scale 75
##############################################################
# Camera config files - One for each camera.
##############################################################
; camera /usr/etc/motion/camera1.conf
; camera /usr/etc/motion/camera2.conf
; camera /usr/etc/motion/camera3.conf
; camera /usr/etc/motion/camera4.conf
##############################################################
# Directory to read '.conf' files for cameras.
##############################################################
; camera_dir /usr/etc/motion/conf.d
#################-------------------
~# nano /etc/default/motion
# set to 'yes' to enable the motion
daemonstart_motion_daemon=yes
~# motion
o
~# /etc/init.d/motion start
7. LAMP
Linux Apache Mysql PHP son las herramientas necesarias para hospedar un servdor web.
Linux Apache Mysql PHP are the necessari tools to host webs.
~# apt-get install default-mysql-server default-mysql-client phpmyadmin wget wput testdisk lm-sensors dnsutils apache2 nmap
~# mysql -u root -p
mysql> SET PASSWORD FOR 'root'@'localhost' = PASSWORD('NewPassword');
mysql> CREATE USER 'dbuser'@'localhost' IDENTIFIED BY 'DbPassword';GRANT ALL PRIVILEGES ON *.* TO 'dbuser'@'localhost' WITH GRANT OPTION;
mysql> CREATE USER 'wpdbuser'@'localhost' IDENTIFIED BY 'WpDbpassword';CREATE DATABASE IF NOT EXISTS `wpdbbase`;GRANT ALL PRIVILEGES ON `wpdbase`.* TO 'wpdbuser'@'localhost';
mysql> quit
8. Wordpress
~# apt-get install default-mysql-server default-mysql-client phpmyadmin wget wput testdisk lm-sensors dnsutils apache2 nmap
-Cambiar wpuser
~# adduser wpuser
~# mv /var/www/html /home/wpuser/html
~# ln -d -s /home/wpuser/html /var/www/
~# nano /etc/passwd
- cambiar la linia
wpuser:x:1002:1002:,,,:home/wpuser:/bin/bash
a
wpuser:x:1002:1002::/home/wpuser:/bin/bash
~# wget https://wordpress.org/latest.tar.gz
~# tar -xzvf latest.tar.gz
~# mv wordpress/* /home/wpuser/html/
~# chmod 777 /home/wpuser/html/wp-content/*
~# rm latest.tar.gz
~# rmdir wordpress/
-ir en el navegador a http://ordenador.local para configurar wordpress
vamos a ello
Nombre de la base de datos wpdbbase
Nombre de usuario wpdbuser
Contraseña WpDbPassword
Servidor de la base de datos localhost
Prefijo de tabla web_
-enviar
-copiar config
-en la terminal
~# nano /var/www/html/wp-config.php
pegar
9. Honeypot
...
10. Appendix
...